Bachelor's Thesis - Development of a content management system
Abstract
When managing the content of a website, developers usually take advantage of tools that make this task easier, such as WordPress. It has been the preferred solution and market's dominant, for both business and particulars. This project presents an alternative solution to WordPress. Although it has a smaller-scale functionality, it proposes a different structure and offers a new method to display the content.
This content manager has been designed and developed from scratch, using Electron as the platform to create desktop apps, NodeJS as the JavaScript interpreter on the Back-End and, finally, HTML, CSS and JavaScript for the interface. With a modular structure, this application uses a common panel for different modules. For more flexibility, each of these modules can be modified independently, without affecting the rest.
The objective of this application is to generate static pages with no need of execution, obtaining better performance and faster content loading regarding other systems. In addition, these pages comply with W3C standards and the HTML content has been optimized, getting better results in search engines.
As a conclusion, I have compared the response time of the generated static pages and their equivalent in WordPress. Additionally, I have run tests with Lighthouse to obtain a global rating of the pages and be able to validate performance, accessibility, good practices and SEO results.
Introduction
Motivation
Throughout the various developments of applications and websites that I have carried out, I have encountered a recurring problem when managing the content that is composed due to the need to use external tools, when it varies frequently or it is necessary to generate new content daily, as happens in a blog, for example. A blog is an almost essential section today in any project and the first time I faced the problem of managing it, was in the development of the website for the company Alien Ventures, where they opted for static content generated by hand by an administrator. This option is not the best because it involves a lot of maintenance effort, but it is the one that requires less development at first and that is why we chose to do it that way. The second, and the one that made me think about a better alternative, was my personal website, where the need to include a blog and be able to publish quickly and efficiently was a must for me.
From my experience, there are three options for managing the content of a blog: every time you have to publish new content, manually generate the corresponding HTML (HyperText Markup Language), use an existing tool that will take care of this task, or develop your own content publishing system.
Depending on the frequency with which the content of a web page has to be updated or requires adding or deleting content, the option to generate or edit these HTML files may or may not be viable, and we must also take into account that entering to edit code is not something accessible to anyone.
Using a content management system, or CMS (Content Management System) as we will call it from now on, has a number of advantages, but also a large number of disadvantages that we will see below and that have motivated this work.
Developing your own publishing tool is a laborious and complex task, which is not within the reach of a basic or average user who wants to manage his personal blog or even that of a company.
Objectives
Before starting to develop the application, there were a number of essential requirements for me. The tool would be based on web technology, this is because it is an area in which we have not delved much in the degree and I wanted to expand my knowledge as it is in high demand in the labor market, so I have been able to experiment looking for a job.
The tool must be designed so that a person with no knowledge of web programming is able to write an article and publish it. The content generated by the manager must be static content and optimized for SEO (Search Engine Optimization), a concept that we will see later. The application, although based on web technology, does not necessarily mean that it will be accessed from a browser, in fact, the application to be developed in this TFG will be desktop and multiplatform, so that Windows, Mac and Linux users will be able to install it on their computers and start working.
This final degree thesis aims to present and explain the resulting application, fulfilling the objectives set, as well as to give an overview of the solutions currently available and to provide further information about them.
State of the art
This work is based entirely on the automated development, thanks to my application, of web software. Not only the final product that generates the application is web, but the application itself, its interface is generated as if it were a web with a JavaScript Back-End interpreted by NodeJS as we will see later. For a reader not familiar with this type of technology, below, different languages and tools that will be used throughout the TFG are explained.
Composition of a page web
From my experience as a web developer, a page, in its minimum expression, is an HTML document that defines the elements that the browser has to represent on the screen. An HTML document is mainly composed of two main blocks, a header where information is specified for browsers and search engines, such as Google, among other information that may also appear in this header. The other main block is the body of the page, where by means of different tags we define the elements, these elements can be of different types and it is important to maintain a structure, so that our page is well designed and easily interpreted.
Other languages can be added to this document that provide more features and allow us to customize and provide functionality to our page. The CSS language (Cascading Style Sheets) gives us the possibility of specifying the specific style with which we want to represent an element of the HTML document, for example, that certain text has a size of twelve pixels or that a block has a red background.
JavaScript is a programming language, which can be executed in the browser, and gives web pages dynamism, allowing us to modify HTML document elements, launch events in response to user iterations with the interface (clicking on a button, scrolling...) or even make extra requests from the browser to the server.
SEO
The optimization of web pages for search engines is one of the most pursued goals by companies today when developing a website. I learned this working at Arsys (cloud infrastructure provider), where positioning one of your pages in the first results for a given search, translates into an increase in sales and, therefore, an increase in profits.
In different trainings by specialized SEO agencies, I learned that getting a good score by the different existing search engines depends on many factors and the algorithms used to score.
Your page change every so often, so positioning your website is a work of continuous updating. Although these criteria may vary over time, generate a web page with a correct structure, for example, that there is no h2 (subtitle) above a h1 (title), or the speed with which your website loads, are attributes of the page that will always favor a better score and will be sought in the pages generated with my application.
Lighthouse
In order to assess the quality of a website, I am going to make use of the Lighthouse tool. Lighthouse is an open source software developed by the community and powered by Google to audit websites [1].
From a URL (Uniform Resource Locator), Lighthouse launches a series of loads on your website and analyzes the results obtained, simulating these loads for both a desktop and mobile version. From the results obtained, Lighthouse gives a score from zero to one hundred in four different categories: performance, accessibility, best practices and SEO [2].
The score obtained in each of the categories is a weighted average of the result of each of the metrics that compose it. The category that will interest us most for this work is performance, within it we find as metrics the page speed index, the total time that the web remains blocked when loading, the time in which the browser makes a first graphical representation of the content, among others [3].
The summary of the audits carried out on the different websites will be shown as an illustration, while the complete report will be attached as an appendix in case the reader wishes to consult it in depth.
Manual generation of HTML
A model of manual generation of HTML embedded content is a classic approach, which over the years has been left behind, although, in my experience, there are still cases in which this model is used. The first step is to build a basic structure that will follow each of your publications on the web page. Once this structure is created and accompanied by styles and their corresponding scripts, generating new similar pages, but with different content, does not involve a great effort in terms of development. The steps to follow would be to replicate the code in a new page and replace the existing content with the new one.
Although it does not involve a great effort in terms of new development, it does involve a greater loss of time when it comes to maintaining it and incorporating new content. Initially, this option would be the quickest to implement, but the least useful in the long term.
We must also take into account that, following this model, the person who generates content must have a basic knowledge of HTML layout, while with the other two alternatives we could extend the development of this task to any person. In this model, human error increases, there may be errors in the HTML tags and this may generate display problems.
Based on my previous experience, choosing this method as a solution to the implementation of a blog, this was completely discarded, looking for a more effective and comfortable solution for me.
Managers of content
What is a CMS?
A CMS is nothing more than a software designed to be used by any user, without the need for technical knowledge beyond the use of the program, for the creation, edition and publication of content, generally websites.
There are different types of CMS, depending on the purpose for which it will be used, for example, a personal blog, a business page or an e-commerce store, among other purposes.
These CMSs manage databases through an interface, used by the web page to display the content independently of the styles, so that the way it is displayed can be changed without the need for it to be modified. They are designed so that once implemented, they can be used by the editors, leaving the maintenance and updating tasks to the developers [4].
History of the CMS
The first CMSs in history were based on simple commands on the server which, thanks to the appearance of the DOM (Document Object Model), which is the representation of the document structure and which provides us with an API to manipulate it [5], were able to modify the HTML content that is finally served to the client from a database.
These first CMSs were created by companies in order to use them for themselves, adapting them to their own needs between 1990 and 2000. Since then, these CMSs have expanded to include many more functions for companies, which have seen their content management tasks simplified. Simultaneously appeared open source CMS available to all users as WordPress (https://wordpress.org/) which we will discuss later, Joomla (https://www.joomla.org/) that not only allows content management but also create forums, polls and calendars among other features, Drupal (https://www.drupal.org/) developed by the community with features very similar to those of Joomla, PrestaShop (https://www.prestashop.com/es) or Magento (https://magento.com/) these last two managers are oriented to e-commerce [6]. All these CMS are developed in PHP (Hypertext Preprocessor) and rely on the use of databases, an approach very different from that of the content manager developed in this TFG.
Types of CMS
Nowadays we find different types of CMS depending on the utility to be given [6], these are:
- Static page builders are intended to generate files that are not going to be modified very often, such as a web page that displays simple information about a company. Wix (https://es.wix.com/) is an example of such a web builder [6].
- Headless, these are content managers that separate the content and the presentation we make of it following the view-controller model where the content does not depend at all on the given styles [6].
- Hybrid, are a mix between web page builders and headless CMS, they allow us to create and edit our pages, but at the same time we can send content to headless platforms [6].
- Digital experience platforms, or DXPs, are packages that include all the tools a company needs to automate content on websites, applications and IoT (Internet of Things) devices, as well as automatic learning of the data generated [7].
If we look at the commercialization model of these CMSs, we can distinguish three types [8]:
- Open source CMS, this type of software has no entry cost, is the most common in terms of managers used by the general public and is the marketing model that my application will follow [8].
- Proprietary CMS, these CMS can be either proprietary that belong to a company for internal use and are not shared with the rest of the users or they are sold through a licensing process to third parties [8]. Here we would find, for example, the managers used by newspapers for their web pages.
- CMS as SaaS (Software as a Service), consists of CMS hosted in the cloud and is usually paid for on a subscription basis [8].
WordPress
WordPress is an open source CMS launched in 2003 by its founder Matt Mullenweg originally intended for the creation of blogs on websites. It is a fork of the now defunct b2/cafeblog CMS [9]. Over the years, WordPress has become a tool capable of creating any type of website thanks to its evolution and the multitude of extensions and components developed in PHP by the community or by yourself, this allows it not to be something that restricts you to what you are branded, thus becoming the most popular CMS today. It is said to have a 30% share of all websites in the world [10] [11].
Technology
WordPress provides a graphical interface accessible from the browser and hosted on the same web server where it has been installed, allowing developers or developers to end users, manage or update content. This process consists of executing PHP code on the server side, to perform SQL (Structured Query Language) queries on a relational database, specifically using MySQL. Subsequently, when displaying the final result of the page, it will be the execution of more PHP code, which, after querying this database, generates an HTML document to send to the browser. The way in which this content is displayed by the browser to an end user depends on the theme, which consists of a set of PHP code that marks the content distribution, style sheets that define how to display it and JavaScript for interface management [12].
In my opinion, even if it has been designed for easy management, after the passage of time, the reality is that the process of implementing a new WordPress site is a tedious task that requires previous knowledge. That is why it is usually developers who perform the implementation and maintenance process and the end customer manages only the publication and modification of content.
Audit web
I find it interesting, as a test, how a newly installed WordPress behaves when it is audited with Lighthouse. To do this I have installed WordPress on my web server and I have not made any configuration or modification of the content that comes initially, it is with the default theme and without any plugin added. This is the result of the audit.
In view of the results obtained in Annex A, we can say that we have achieved a good score, however, it is striking that without having added absolutely nothing to WordPress, we do not get a score of one hundred as standard, in terms of performance. Not getting the maximum score in SEO is something that we can understand, since this assessment depends on completing metadata subsequently used by search engines that has not been completed.
In order to add functionality to our website, Worpress offers the possibility to install third party plugins, developed by the community. Each one of them has a different behavior and it can become complicated to use a plugin for almost anything you want to add. Depending on your WordPress site is getting bigger, more complex and has more content, its performance is practically impossible to keep it high, getting terrible ratings from Lighthouse. For example, TechCrunch, one of the most famous technology portals in the world, is made with WordPress and below we can see the result of its audit in Annex B.
It is logical to think that as the complexity of a website increases, it is very difficult to maintain a good performance, and even more difficult to maintain it with WordPress, because you get to lose control of all the execution and requests that exist behind.
Security
If we take into account the fact that 30% of all websites on the planet are built with WordPress [11], it makes sense that this is one of the most hacked platforms in the world [13]. Having a lot of popularity is not always a good thing, and if you build your website with WordPress, you are exposed to any security problem that this platform has, since it uses server execution for any task.
The WordPress control panel is accessible via the Internet to anyone, usually at the URL "domain/wp-login.php", which exposes the login process to any attacker.
Why don't I use WordPress?
WordPress is a very powerful and useful tool precisely for the task I needed to implement a blog on my personal website, however, this was never a valid option for me. One of the biggest problems I encountered was that I needed a tool capable of just managing the content with total independence of where it was going to be inserted since the rest of the website was already built with its own development, so inserting a WordPress blog would require the laborious task of creating a theme replicating exactly the interface and behavior of the rest of my website.
Accessing the management panel through the browser and having it residing on the server is a way to unnecessarily expose the platform to possible unwanted intrusions or malicious attacks, for this reason I decided to make my application a desktop application, protecting it more from the outside world by having it locally on my computer.
WordPress adds too much functionality and code that becomes unnecessary when you only need a specific task, in my case a simple management of articles, so I see better another tool focused specifically to what I need and that does not add more code than necessary. Creating these pages dynamically is another reason why I am not willing to use the tool, since the desired content of my website is static and the goal is to get the best performance possible, avoiding database queries or server-side executions.
Development of a proprietary CMS
Since the first two alternatives mentioned above were not to my liking because they did not meet my essential requirements, I decided to embark on the project of designing my own tool. To understand the decisions I made regarding its design, it is important to have clear some concepts about different possible architectures.
Document request HTML
A user requests the browser to access a resource through a URL address, this address is nothing more than an alias that the DNS (Domain Name System) servers translate into an IP (Internet Protocol) address belonging to the web server where the page is hosted. The browser sends an HTTP/HTTPS (Hypertext Transfer Protocol Secure) request, with its headers and corresponding method to the web server. Using the headers, the web server responds with the resource that the browser will then interpret. Apart from the elements that make up the resource, extra resources can be specified, which are necessary for the final construction of what the user will be able to see, these can be style sheets, JavaScript code, photographs, videos... It is as these references are found, when the browser asks the web server for these extra resources, which are sent back.
One of these resources that the browser asks for can be an HTML document and this does not have to be complete at the time prior to the request, but can be generated or modified at the time of the request or a posteriori. During all this process we find different steps until we obtain a final result.
Rules of the server
Whether we are talking about an Apache, Nginx or NodeJS web server for example, all of them have a set of rules when processing a request to know how to handle each of them. In the case of Apache, the ".htaccess" file is used, in which you can specify redirections from one URL to another, rewriting of the URL itself, compression methods for resources...
This step is always present in any web server and regardless of how we are finally going to generate the resulting HTML, we have to count on this extra time that adds going through this request processing.
Return of documents HTML
Once the request has been processed according to the specified rules, the web server proceeds to return the document requested by the browser. At this point there are two possible cases.
Execution
The requested document is not ready to be returned at first, since it lacks all or part of its content and requires prior processing. This processing is performed by the execution of a code on the server, so we will be using CPU (Central Processing Unit) and RAM (Random Access Memory) resources of the machine that, depending on its size, type of execution and number of requests we receive, can be a problem for the performance of our web server.
Many server-side languages are used, for example PHP, Java, Ruby, Python or even JavaScript. This model is a great advantage when it comes to simplifying the content of a web page since, in an automated way and depending on the resource requested by the user, the web server is able to generate the corresponding HTML document. In addition, we can go a step further and query data, either in a database, in a JSON file (JavaScript Object Notation) or even in a plain text file, to generate the resulting HTML content.
Regardless of code optimization, server power or database engines used, this means adding more steps when returning an HTML document, which translates into more waiting time for the end user. In addition, if our model becomes more complex and consists of many external dependencies, each of these calls increases the response time.
Static files
The requested file is ready to be returned by the web server, since it has all of its content and does not require extra processing to complete it or database queries. In this model we avoid extra steps achieving a shorter response time and freeing the server of resource consumption.
On the other hand, we lose the flexibility and dynamism provided by server-side execution, limiting certain functionalities.
Execution on the client side
Once the browser has obtained a response, it proceeds to interpret and render based on the HTML tags, CSS styles and the execution of the JavaScript code present. Within this client-side execution we can find other languages such as C or C++ thanks to the appearance of WebAssembly, which is nothing more than a portable binary code format [14].
These scripts can manage events on the web interface itself, but there are also other scripts that are responsible for modifying the content of the page itself by making additional requests to the server. The latter is what frameworks such as Angular, React or Vue do, they are nothing more than JavaScript libraries that provide tools to developers for the development of interfaces and especially SPA (Single Page Application) pages. This type of page generation has a number of disadvantages, as does server-side execution, since we are adding more steps before being able to display the final content to the user and this means more waiting time for the user.
Model of my application
Considering that the goal of my application is to manage the content of a web page, it makes sense to think that the perfect model to follow is the server-side execution consulting databases where to obtain the content of each of the articles of the blog and perhaps use some kind of JavaScript framework for the generation of the interface. This way is the most used and common way to do it, however, in my experience as an SEO analyst, this model is not the optimal one for several reasons.
Search engines like Google, nowadays, go through the internet consulting existing pages and indexing their content in their results pages. Specifically, Google renders your web page twice, once and the most important of the two, simulating being on a mobile device, and a second time, simulating being on a desktop. During the rendering process they take several screenshots at different times during the loading process. When you have HTML generated from scratch in the client, you make sure that when Google takes a screenshot of your website to check the visible content, it is present. We achieve this both with static files that later do not require extra requests from the client, as well as with pages generated in execution on the server. However, when we use client- side JavaScript frameworks, we risk that when Google checks our website, part of the content or the most relevant is not yet being displayed and therefore is not indexed in the search results, this happens because Google does not stare infinitely at your website, but waits a few seconds while taking the screenshots and leaves. As one of the objectives of the pages generated with my application is to favor the search optimization, I use HTML with all the content embedded in it.
Another goal I set myself is to try to keep the response time when consulting the web as short as possible, and on the other hand, I also wanted the application and the content files it generates to be independent of the server where the web is going to be hosted and the technologies it may have, in such a way that is not a requirement that the server has PHP or NodeJS but that it can be used in any type of web server. This is why server-side execution was discarded, and therefore the database query model was also discarded, thus reducing server resources, calls and waiting times.
Technology used
NodeJS
Scripting languages are intended to be used in conjunction with other programming or markup languages such as HTML; such languages are interpreted and do not require a compilation process prior to code execution [15].
One of the most popular scripting languages in the world is JavaScript, this object-oriented language was first incorporated into the Netscape browser and copied by Microsoft into Internet Explorer under the name JScript. Since then JavaScript has only increased in popularity and functionality [16]. Along with the emergence of the DOM, web programmers are able to manipulate page elements and create dynamism in certain elements or user interactions with the interface. JavaScript is interpreted by JavaScript engines built into browsers, for example, Google Chrome, uses an open source engine written in C++ called V8.
Considering the popularity and usefulness of this scripting language, the idea of being able to be used outside browsers, either on a personal computer or on a server, makes sense. NodeJS is a JavaScript interpreter, using Google's V8 engine, based on the execution of asynchronous events, designed mainly for network applications that can be scalable [17].
For the management of asynchronous calls, NodeJS incorporates the possibility of sending functions in the calls as callbacks, which are executed once the process has finished. One of the advantages is that the processes are never blocked and it is designed to work without threads, although there is the option if the developer wishes [18].
Personally, using NodeJS to develop desktop applications, as well as for execution on the server, is a huge advantage because it unifies Back-End and Front-End development in a single language, JavaScript. This always means easier maintenance and less work for the developer's specialization in different languages. Thanks to asynchronous calls, we can easily achieve better performance than in a concurrent language.
NodeJS, in my experience, is a rising technology increasingly present in all computer developments and has not been studied in the degree, which is also why I take advantage of my final degree work to get information and skills with this technology.
Electron
Electron is a framework for developing cross-platform desktop applications with JavaScript, owned by Github, which in turn is owned by Microsoft. It provides a series of APIs (Application Programming Interface) at the operating system level, and uses Chromium to display web pages as an interface.
Applications web
Since the creation of Electron by Github and the development of its two originally most famous applications, the Atom code editor and the Github client itself, it is a technology that has been gaining more and more traction. Microsoft's acquisition of Github led to popular applications such as Skype and Teams being built on this technology. Today we find a large number of famous applications created with Electron, such as Whatsapp, VScode, Discord... [19].
The strong presence that Electron is having is mainly due to the ease with which you can port applications from the web to the desktop or vice versa, since the code used is highly reusable. In this way you can maintain both the web version and the desktop version practically as if it were the same development, without having two completely independent ones in parallel. It is also a great advantage the fact of being able to export your applications to MacOS, Linux and Windows automatically without having to make modifications in the code, having the possibility of even generating the application in portable mode.
In my opinion, desktop applications under web technology is the future and the way the market is going, the good performance, security and accessibility offered by this development model represent considerable advantages for developers.
Other companies such as Google are also betting heavily on web applications, however, they opt for their own technology called Progressive Web Apps, which is roughly an instance of Chrome with a particular page and removing elements of the browser interface.
Architecture
Electron consists of two different types of processes. The so-called main process is the one in charge of generating web pages as a graphical interface, there is only one of this type per application and it is specified in the JSON "package.json" the file containing the code of this process. Each time a new web page is generated, a new process called viewer process is created, isolated from other processes of the same type, which may exist as many as required by the application. Once the instance of the page is destroyed by the main process, this viewer process is also destroyed. The main process is executed with NodeJS, which is why we can access all its libraries and routines [20].
The main difference when implementing web pages as an interface in this type of applications with respect to the execution they could have in a browser, is that Electron provides JavaScript with the option of communicating with operating system routines, something unthinkable in conventional web pages, since this would entail serious security and resource leakage problems.
To understand how Electron works, let's make a simile with the architecture of a conventional web page. Electron consists of a Front-End and a Back-End. The Front-End is handled by the viewer process and would be equivalent to a browser, just as any web page consists of HTML files, CSS files and JavaScript files that, apart from their current functionality, are able to communicate with the Back-End using modules offered by Electron. The Back-End is managed by the main process and would be the equivalent of a web server, it uses JavaScript interpreted by NodeJS and is in charge of responding to requests from the viewer processes and creating and destroying them.
The communication between Front-End and Back-End, i.e. between the main process and the different viewer processes, is carried out by the "ipcRender" and "ipcMain" methods. The "ipcRender" module provides a number of methods for sending synchronous (the renderer process stops until it gets a response) or asynchronous (the renderer process continues its execution) events to the main process [21]. The "ipcMain" module provides methods for handling events received in the main process, having the possibility to return a response [22].
Features
Since from Electron we can access operating system routines, it gives us the option to interact with general features of operating systems such as keyboard shortcuts, notifications, drag and drop files or support for dark mode if the user has it configured in the operating system. It also gives us the possibility of integrating features of specific platforms such as compatibility with the TouchBar of MacBook.
Development of the project
The developed application is called Block Manager or BMM, as we will refer to it from now on. In the following sections we will see its functionality and how it has been implemented.
Architecture
For the correct functioning of the application it is only necessary to have a web server and a domain that resolves to the IP address and directory where GdB synchronizes the HTML files. Being static content, this content manager is compatible with Apache servers with PHP, NodeJS servers or any other type of web server. No database is required.
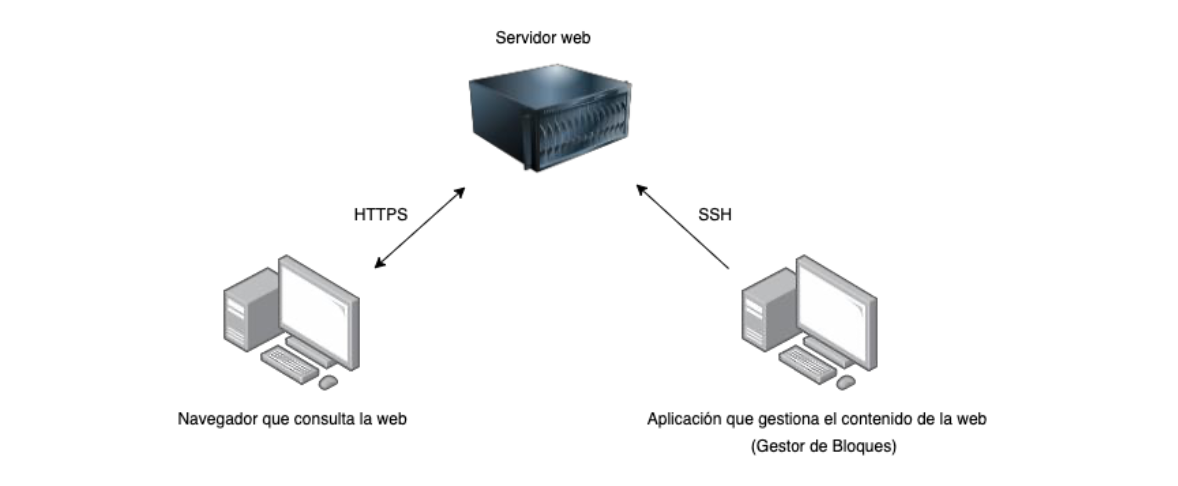
GdB is installed on the computer of the user who is going to manage the content of the web page, after being correctly configured, this application communicates via SSH (Secure Shell) with the web server. Through this encrypted tunnel, GdB is able to upload or delete HTML files that will later be served to a browser via HTTPS.
One of the advantages of having the application installed on the computer is the possibility of making the application compatible with a mode of offline content editing and later synchronization with the web server. This feature is not implemented in this TFG and remains as a possible improvement for the future.
Structure of files
The application consists of a few main files in the root directory and some folders where different resources and functionalities of the application are concentrated.
Files on the root
In the root of the directory we find the following files:
- "package.json": when we are creating an application in Electron, what we are really creating is a NodeJS application in which we specify that we are using the Electron framework. We specify this with the metadata "scripts" in which we indicate that the "start" command of NPM (Node Package Manager), the package manager of NodeJS, executes Electon. In this file are also specified dependencies of the application, i.e. NodeJS packages, as well as the version of the application, its name, author, description...
- "main.js": this JavaScript file is the application's Back-End executed by the main process. It is in charge of responding to Front-End JavaScript calls and creating the web interface window.
- "index.html": it is the HTML file used for the graphical interface of the application, on this file the whole application is shown since it is a SPA, that is to say, moving through different sections of the interface we do not generate or destroy windows, we change the content on the same HTML.
- "style.css": defines the general styles of the application panel, there are other style files, but for other more specific parts of the application.
Folders at root
In the root of the directory we find the following directories:
- "node_modules": this directory contains each of the NPM modules used by the application, apart from the dependencies that I have needed, there are also all the files belonging to the Electron framework.
- "modules": each one of the sections of the application panel is a different module, this will be seen in depth later on. In this directory you will find the folders of each of the modules of which the panel is composed.
- "font": contains the font used by the application texts (Roboto), as well as the icon font (Material Icons).
- "auto": the auto folder contains all JavaScript files that are used on the Front-End side.
- "data", stores files with information used locally by the application.
- "pages", contains the HTML and JSONS generated by the application that will later be synchronized with the server.
- "template", contains the necessary files for the export of the content in the desired format, depending on how the final HTML is to be built.
Panel
As I have commented previously, the panel is composed of a single HTML file on which we load and download, show and hide content from the JavaScript. The first step for the generation of the interface is the creation of the window from the Back-End, for this the framework gives us the object "BroserWindow" in which we specify that the width and height of the window, by default will be 1200 pixels, being the minimum height and width allowed 800 pixels. In addition, we remove the default frame of the operating system to later create and manage the window events myself.
The panel consists of three basic elements: a header, a side menu and the section where the content is displayed. Below, you can see the empty panel without any module loaded.

Both the header and the side menu have a fixed position, so when the scroll event occurs they are not affected. The main section of the panel, where the content of each section of the menu will appear, has inner margins at the top and left so that the other two elements do not overlap on top of the content. In the header we have included our own icons to minimize, maximize and close the application.
Modular panel
One of the intentions of this panel is that it was open to new developers who want to use it for different applications with other uses, that is why the functionality of moving through the menu modules and loading them on the panel is independent of the content manager itself. It has two peculiarities that make it modular.
Automatic loading of JavaScript
The JavaScript used in the application from the Front-End, as in the web pages, are referenced from the HTML file that specifies that it requires them. The application requires many different JavaScript, however, from the only HTML we have we only reference one, "part.js".
To contain our JavaScript code, we use an object that contains all the methods we need. To generate this automatic loading of JavaScript I have created a proxy object that acts as an intermediary between any call to a method of the object and the object itself.
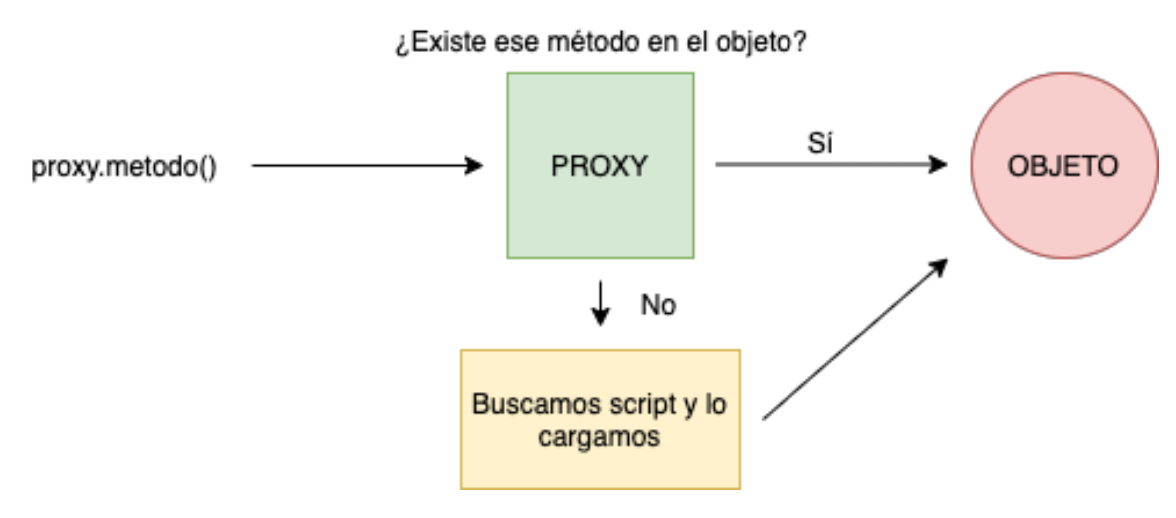
The proxy object has been named "auto", the only conditions when creating a new JavaScript file is that it is an extension of this object and that the file is named the same as the method it implements. Each time we call a method of this proxy, it checks if this method exists in the final object. If this method exists, it proceeds to call the method, otherwise, the proxy searches in the "auto" directory for a JavaScript file with the same name as the requested method, finally it inserts a new "script" tag in the HTML including this file.
With all this what we get is that the incorporation of new scripts in this panel is as easy as creating a new file in the "auto" directory and without having to include its load in the HTML, the first time it is called this method will be loaded automatically. Since not all scripts are loaded at the principle we save time in the first instance, and only carry out charging when it is really necessary.
Automatic loading of modules
We call module of the panel to each one of the sections of the menu and that once accessed, its content is loaded in the space destined for it. Each of these modules is a directory, inside the "modules" directory, which contains four different files.
- "content.html": this file contains all the HTML code of the module itself, which will later be embedded in the main HTML of the panel.
- "content.css": in this file goes all the CSS code of the module itself, which will later be added via the "style" tag in the main HTML to load this stylesheet.
- "content.js": this file contains all the JavaScript code that affects the interface parts of the HTML part of this module, as well as its own functionality.
-
"module.json": defines the module's own characteristics, used by the panel for its correct loading. It is a JSON file with the properties:
- "icon": specifies the icon to be displayed in the menu.
- "name": specifies the name of the module, also used by the menu.
- "html": specifies the name of the HTML file of the module.
- "css": specifies the name of the module's CSS file.
- "js": specifies the name of the module's JavaScript file.
- "order": specifies the order in which it should appear in the menu.
In this way the creation of sections of the panel is completely independent of the panel itself, giving the possibility to include whatever we want, or even opening the door for developers to create new modules that extend the functionality of the content manager.
Operation
Once the application has started, the JavaScript scans the "modules" directory to see the existing modules, for each of them, it accesses the JSON file to get all the module information and to be able to set the corresponding icon and name.
When adding a new module, we must create its corresponding section in the menu, so we generate a new HTML element "li" that contains the attribute "data-folder=nombreModulo", with this, when the user clicks on a section of the menu, he knows which module to load.
The first time that a module is entered from the panel, it does not exist, therefore, we have to load it in the panel. A JavaScript file is in charge of checking if it already exists or not, if it does exist, we hide the previous module and if it does not exist, thanks to the aforementioned attribute, it knows which directory to access to get the corresponding HTML, CSS and JavaScript files that are inserted in the main HTML of the panel.
Conflict between styles
One of the problems encountered when following this logic of the modules, is that a developer external to me, his styles applied on his module conflict with the general styles of the panel. This happens because there is no way in web technology to indicate that a style file affects only a module of the panel, so it could be the case that style rules affect other unwanted HTML elements, causing display errors in the interface.
To solve this problem, all module CSS files, their style rules must begin with the condition "[data-module=module-name]", so we ensure that these rules affect only the HTML contained within the tag containing the module itself.
JavaScript conflict
The same problem that we had with the styles, we found it with the JavaScript. By having a file for each module and these may have been developed by different people, it may be the case of overlapping variable names, overwriting of methods or when doing the "querySelect" to take DOM elements that we are selecting elements not belonging to that module.
To solve it, we create an object that contains for each one of the modules an own attribute that contains all the HTML of that module, at the time of making a "querySelect" instead of doing it on the whole DOM, we do it only on this attribute of the object (object.nameModule.querySelector('.class');).
Communication between modules
As the modules are independent of each other, there is no direct way to share information between them since their JavaScript does not belong to the same object or depend on another common JavaScript that can act as an intermediary. The solution to this problem has been to implement an attribute in the proxy object of the panel, accessible by any module to be able to store variables as a local cookie of the computer.
Events at the Back- End
We have seen how from the main process we have created the window where the application interface is shown, apart from this function, from here we manage all the calls that come from the Front-End.
For example, as we have removed the operating system frame from the window, the icons displayed in HTML once they are clicked, the event is picked up by the JavaScript on the Front-End side but this does not have the ability to execute the Electron instructions to perform the corresponding task. What these events do is to send a message to the Back-End indicating that you want to perform this task and this is executed by the main process.
These events may have been sent synchronously or asynchronously, in the case of synchronous events, we will send a response back to the Front-End so that it can continue with its execution.
Configuration of the application
The first time you run the application, once it has been installed on your computer, a simple configuration process appears to provide you with the address and credentials of the web server to be used.
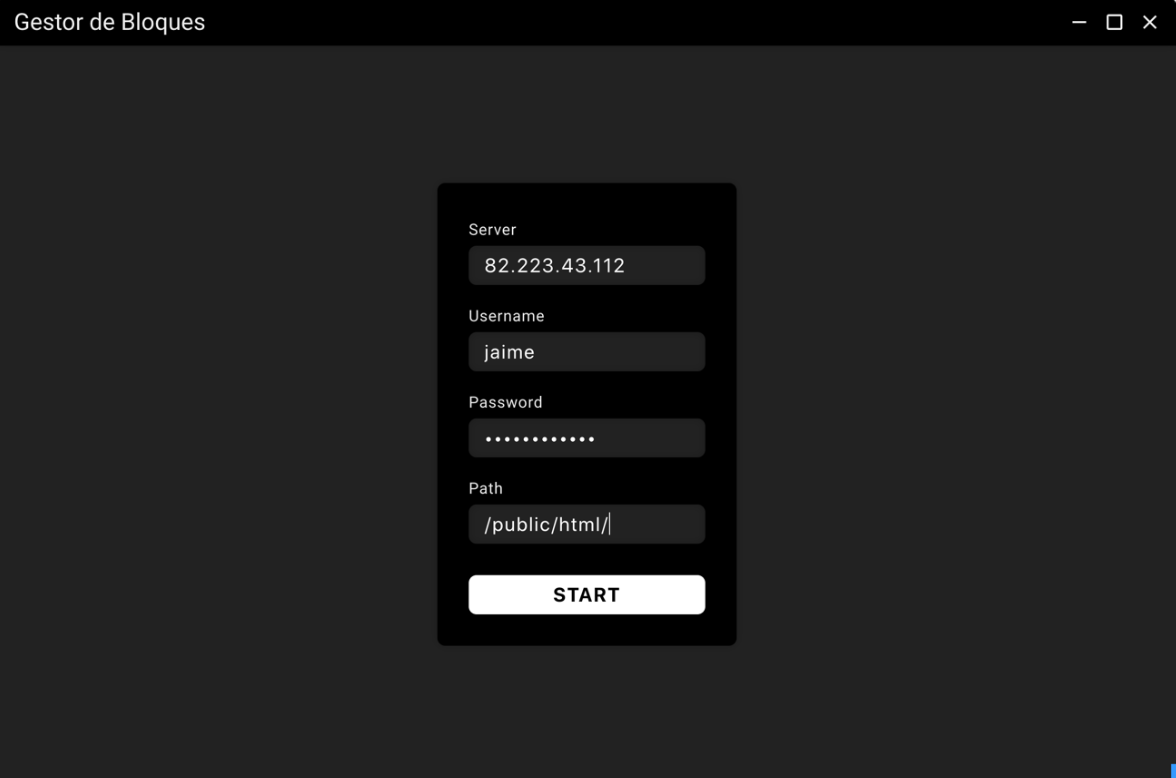
The "Server" field accepts both the IP address of a server and a domain that resolves to that IP address. The "Username" and "Password" fields correspond to the SSH credentials of the server, preferably and to avoid permissions problems, it is recommended that the user provided is root. The "Path" field specifies the directory in which the application has to work, this directory has to be inside the web server directories and it has to be able to resolve the request to these files by HTTPS.
When the user presses the "START" button, the application proceeds to establish an SSH connection with the server, this connection is achieved by using the "node-ssh" library of NPM. The first thing we do is to execute the "ls" command in the directory specified by the user and check that there is not already a folder called "blog", which is the name of the directory used by the application. As we are setting it up for the first time on a server where this application has never been connected, this directory will not exist, so by SSH we create the directory with another directory inside called "data", which we will use to store the login credentials. Finally, before finishing this process, we generate a JSON file that we will store locally with the data entered by the user, this way the next time we enter the application, before asking for them, it will check if they exist in this file, in case they do, it will skip this step and will read the JSON to have the credentials and to be able to establish the communication.
We already have the connection established with the server, but we do not have a user created, this is because when we SSH and do an "ls" in the "data" folder there is no "users.json", so the application asks us to create a new one.
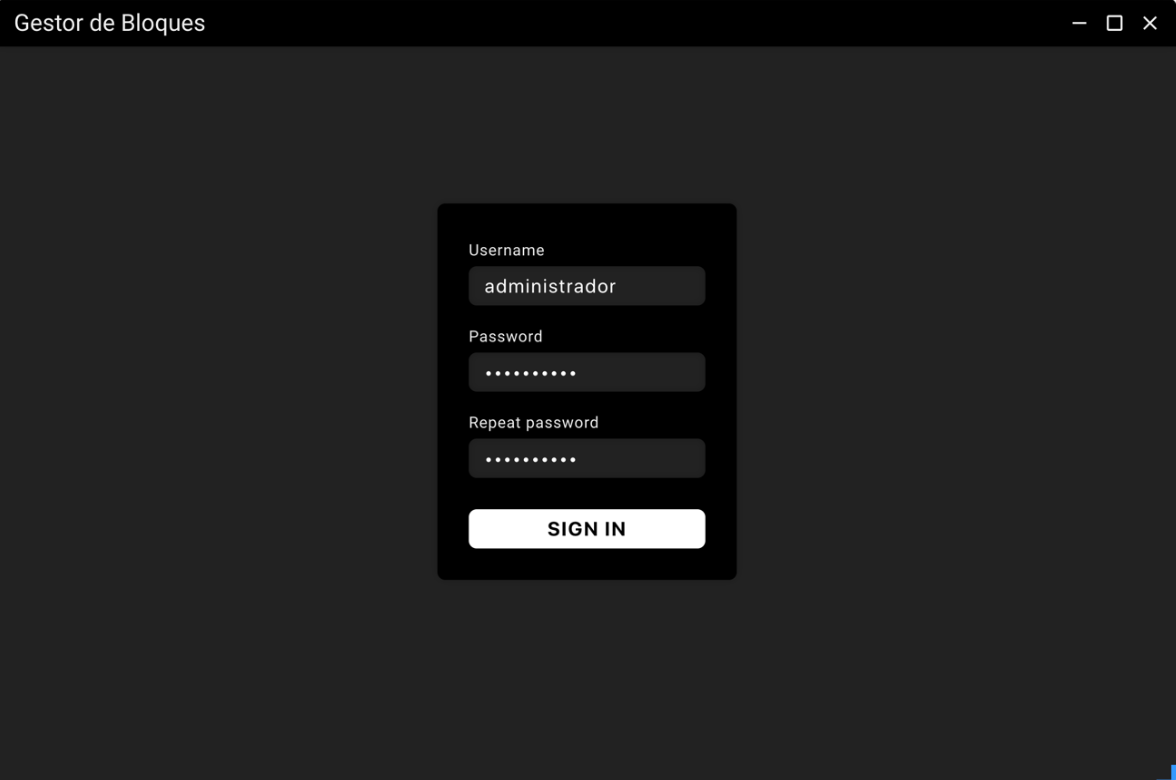
Once the user clicks on "SIGN IN" the first thing we check is that both passwords entered are identical, if so we proceed to generate the user. Generating a user is nothing more than the creation of a JSON file with the data, as this file will reside on the server, we can not store the password in clear, so we pass it through a secure hash function. For this we use the "bcrypt" library, in particular the "hash" method, which uses a hash function of its own implementation, to which we indicate the number of rounds through which the password will be passed in an argument, each of them with a different salt. Once we have the password hash, we generate a "users.json" file where we store all this data and upload it to the server in the "data" directory.
The purpose of this dissertation is not to create a fully secure application, and for this reason we have not gone deeper into the security of the credentials. By the nature of the application, it is not possible to access the authentication process from the outside as the application resides locally on your computer, but, as the "data" folder resides on the server, and it contains sensitive information, it is recommended that the user does not make this folder accessible via HTTP/HTTPS request. This type of rules in web servers like Apache, can be specified in the ".htaccess" file. For future updates of the application it would be interesting to reinforce the application to avoid possible attacks and unwanted manipulations of the generated web pages.
Login
In order to use the application, it is necessary to go through a process of authentication and authorization, to prevent another person accessing your computer to modify the web. This process will also be important for later features of this application, such as the differentiation between user roles and the permissions that each of them have, improvements not implemented in this TFG.
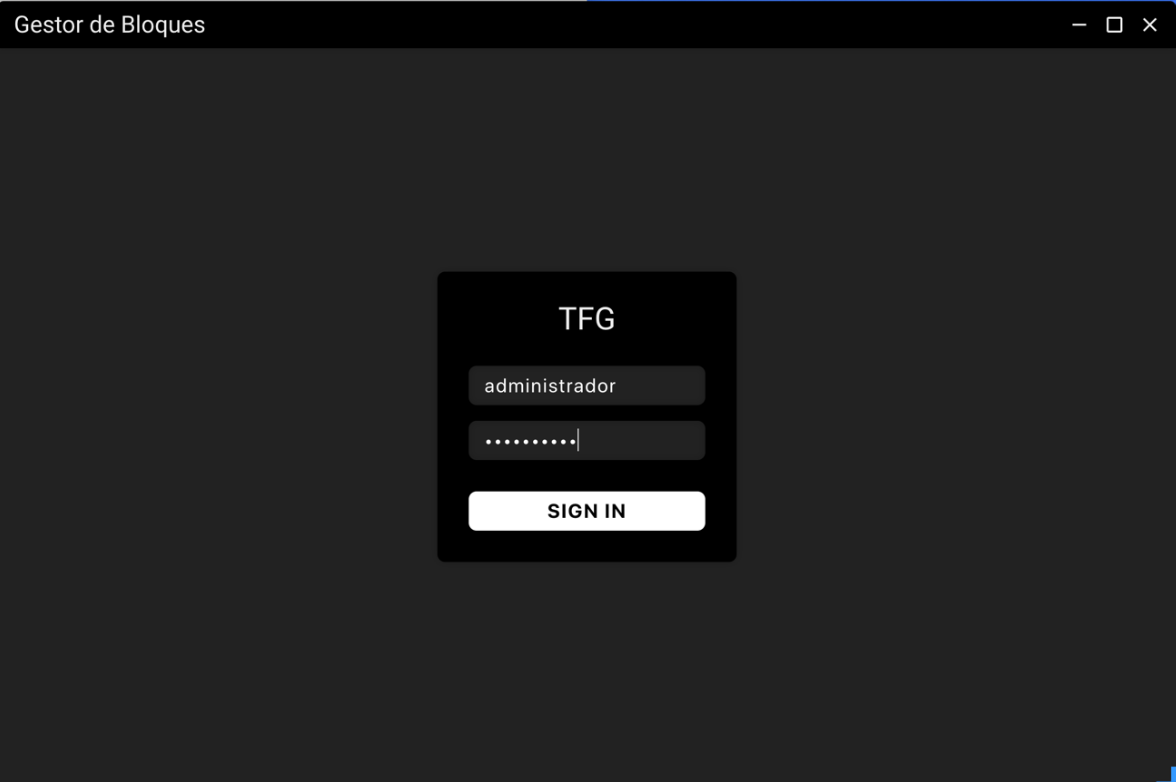
The application downloads from the server, every time we login, the latest version of the file "users.json". Once we have the file locally, we pass it to a JavaScript object and compare the existing fields with the one entered by the user, as the password is not clear, we use the "compare" method of the "bcrypt" library, which passes the clear password entered by the user through the hash function and determines if it is correct.
Once the Back-End communicates to the Front-End that the process has been successful, it proceeds to hide the login box and load the application modules in the panel as explained above.
Dark theme and light theme
Following the current trend in web front ends, mobile applications and desktop applications, GdB has support for both dark theme (the one seen so far) and light theme.
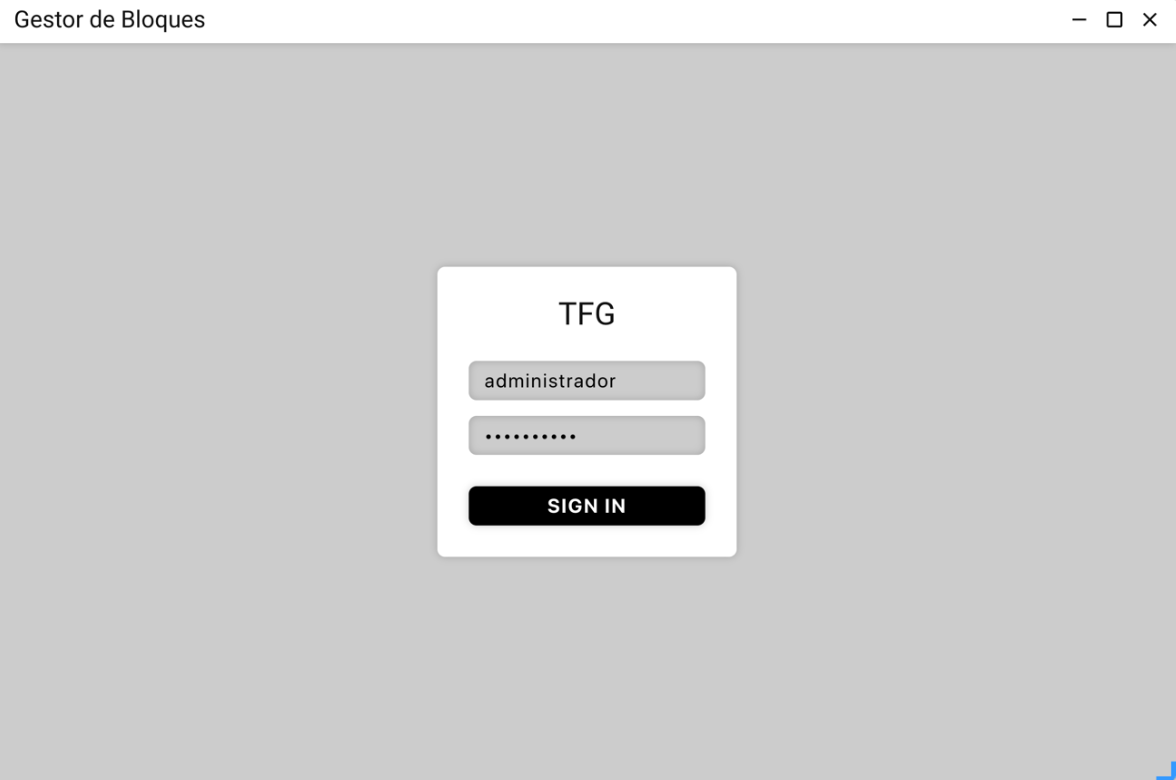
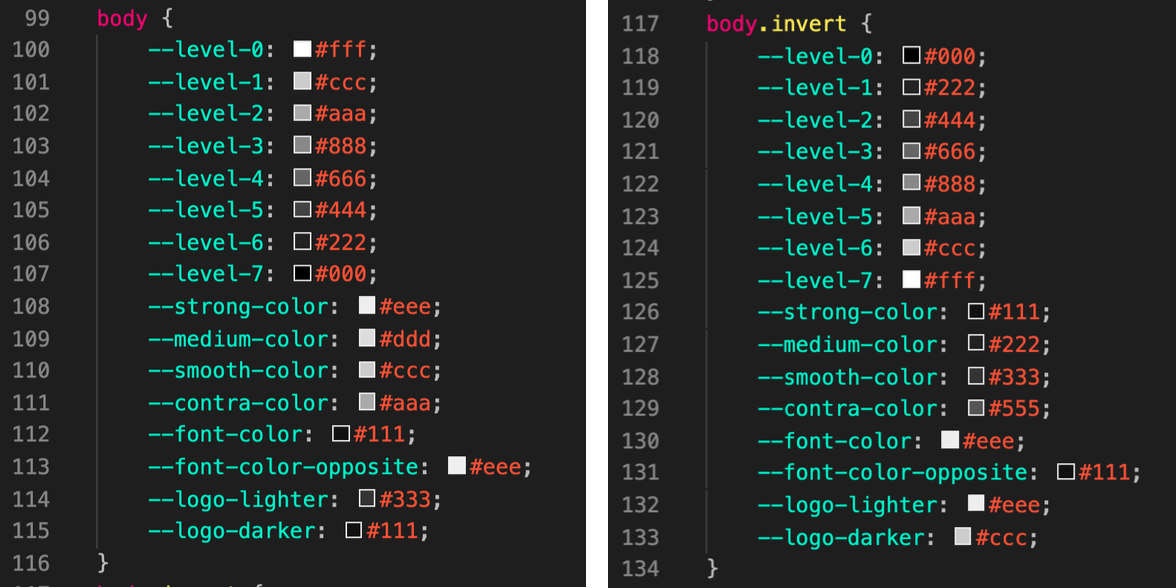
In order to develop a single interface independent of the colors, I have developed all the CSS rules referring to colors, instead of fixed values, variable names referring to levels of darkness. Specifically, the interface moves in seven shades, that is, seven levels of colors, which behind these can be whatever you want following a scale in the same range.
To decide which range is applied to the interface, CSS variables containing the colors are applied to different classes of the "body" element of the HTML document. If the "body" does not have a class defined, by default the interface is clear, however, when we add the class "invert" it becomes black, this happens because we overwrite the variables with those colors and automatically all the elements of the interface change.
Module editor
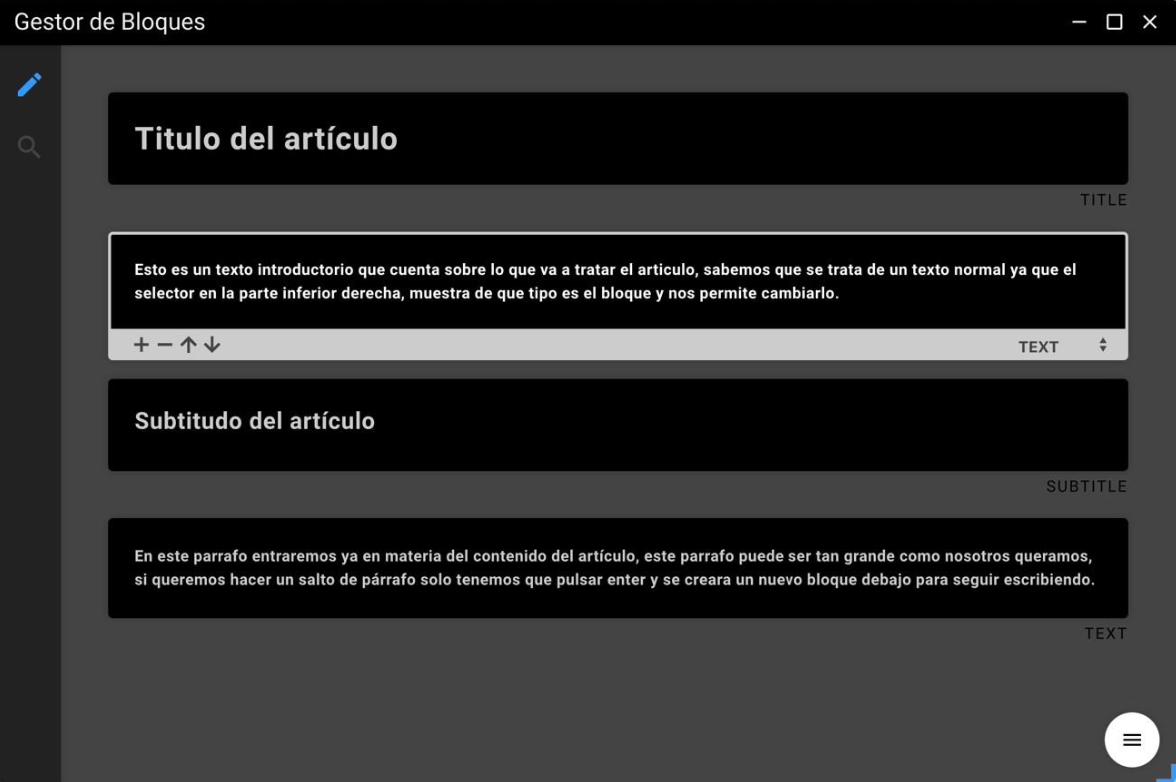
A content manager must have a text editor that provides its users with a simple interface where to write. The module in charge of this is called "editor", it has been designed following a block structure, hence the name "block manager", in which each element to insert content is a block. Each of these blocks consists of two elements, the text of the block and its type.

A blog post in this content manager is nothing more than a succession of blocks, in which each of them has its own space where to write the text and a selector at the bottom right that allows us to define whether the text is a paragraph, title, subtitle or header. The buttons at the bottom left of each of these blocks allow us to define whether the text is a paragraph, title, subtitle or header:
- The plus button allows us to add a new block that will be inserted just below the block from where we are clicking the button.
- The minus button allows us to delete the block we are currently in.
- The up arrow button allows you to move the block up one position.
- The down arrow button allows you to move the block one position down.
Blocks
Each of these blocks in HTML is a "section" with the class "elementEditor" that allows us later, from the JavaScript, to go through each of these to extract the content. In turn, the block in which we are at a given time receives the class "active", which highlights the block so that the user knows where it is, displays the bottom menu with buttons and allows the user to edit the text. Within this "section" we find two different parts.
The part of the block that allows the user to insert text, is a "div" which through the attribute "data-type" specifies what type of element it contains, in illustration 11 we see how it is a text type block, therefore, the "data-type" of this block will be "text" and the HTML element inside it will be a "p". So that the user can insert text, the HTML element is specified the attribute "contenteditable=true", this allows a user from the interface to insert text from the interface, and this will be inside the HTML element that received that property.
The second part of the block is another "div" which contains the icons of the buttons with their respective ids to be able to be treated the events from the JavaScript and a "select" to be able to change the type of block that we want.
Interface of the module
When we are going to create a new article for the blog, we enter the editor module of the panel, by default only a block of type title appears, that is to say, a "h1". This block is the only one that the application does not allow you to change the type, or to be moved in position with respect to other blocks, this is because, by good practice when generating a website, all must contain a single "h1" and this must be positioned at the beginning, as search engines give much relevance to its content in order to index results. Other later blocks also do not allow changing the type to title, to avoid having more than one "h1" on the page.
For faster typing, in addition to the buttons available in each of the blocks, we create events that are triggered by pressing certain keys on the keyboard, such as enter, which has the same behavior as the plus button, the arrows on the keyboard allow us to quickly move between the different blocks.
When we add a new block, what we do is to generate the HTML of the block from the JavaScript and insert it after the block from which it is being added. The same thing we do when we delete or we move between blocks, it's all JavaScript events that alter the DOM to fulfill the functionality of each of the buttons.
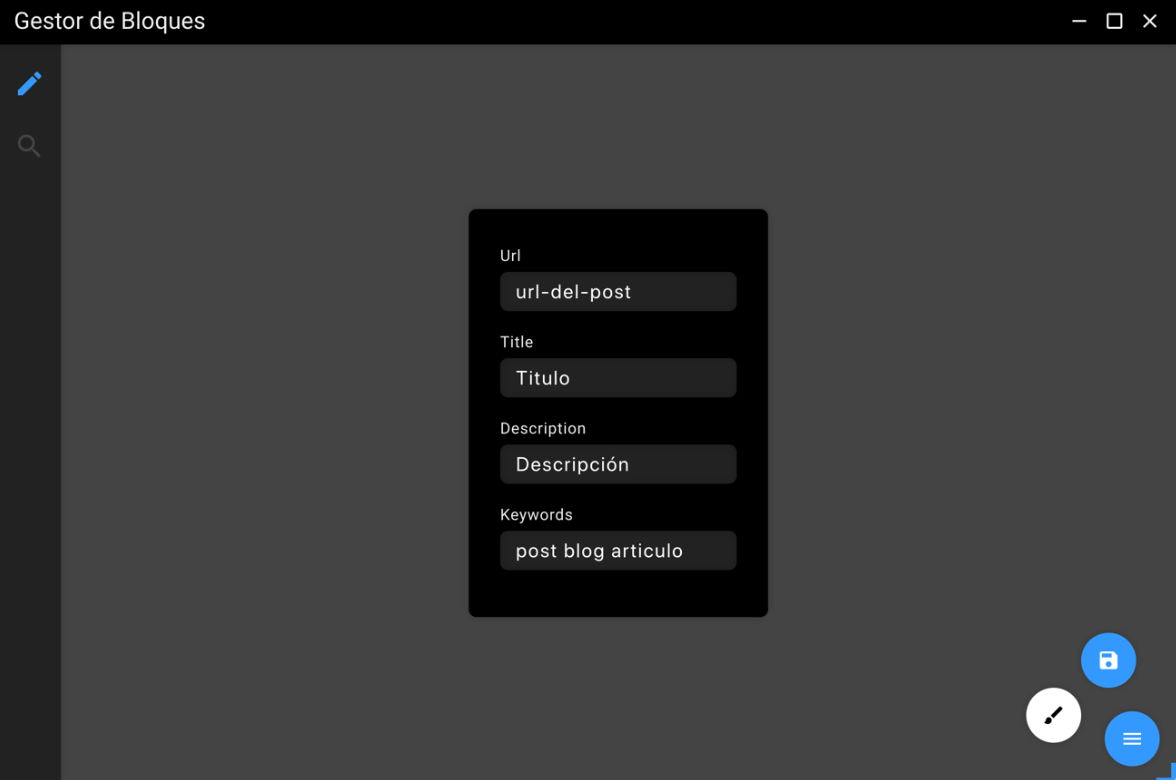
At the bottom right, we find a button which when clicked displays two others, with one of them we can save the article and with the other we will access the fields we have to fill in the metadata of the article.
Template
As we have already mentioned, one of the objectives is to be able to add this blog on already developed pages. So that the export of the blocks is made in an HTML adapted to the web page on which this blog will go, it is as easy as adding a template in the directory destined for it inside the application.
A template is composed of three different SHTML (piece of HTML that is inserted somewhere), and uses a markup system for later replacement by searching for keywords that are replaced by content. The idea is to divide the HTML structure of your current web page in two parts, on the one hand, all the HTML that should go above the content of the article you are going to publish (web menu, header...) and, on the other hand, the HTML code that should go below the article (footer, bottom menu...). The name given to the upper SHTML is "up.shtml" and the lower one is "down.shtml". The third SHTML required is the one that defines the HTML structure in which each of the article entries will be displayed on the main page of the blog, from which you can access each of the articles.
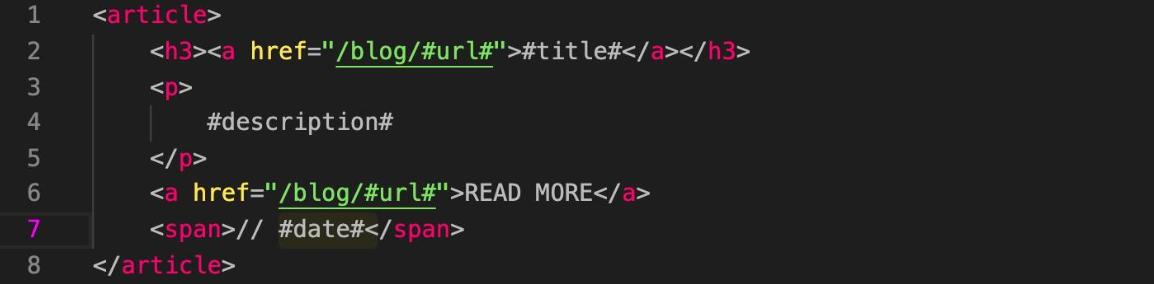
In illustration 14 you can see the structure defined for the export of each of the entries to be seen as I want on my website, where "#url#" is replaced by the URL that takes you to the post in question, "#title#" by the title of the article, "#description#" by the general description of the article and finally "#date#" by the date on which it was written. This once on the server and with the CSS of my website would look like this.

Export from article
Once the user has finished editing the article, he just has to hit the save button. When this happens, the application generates two files, a JSON file and an HTML file.
As we have commented previously, the blocks where the user edits are a "div" that inside contain the element in question (h1, h2, h3, p) depending on the type of block that is, with the property that can be edited, so to generate the final HTML that will be published on the server we only have to take from the template folder the file "up.shtml" and that string concatenate it with all the blocks that the user has made and finally this concatenate it with the file "down.shtml". This way we have the complete file ready to be uploaded to the server, although at the moment this file only exists locally in our computer.
At the same time, when we save, we generate a new object that finally will be saved in a JSON, this object will store relevant information about the article we just created, such as the date it was created, if it is online or offline on the server, a unique id to differentiate between each of them and finally an object within it and an array of objects. The object "goals" contains all the metadata that the user has put on the article. The array of objects "blocks", is the one that contains all the blocks in the editor, each of these blocks is an object with two properties, the type of the block and its content.
This JSON that we have generated, will be useful later to obtain important information about each of the HTML when synchronizing with the server or to rebuild the article editor with the content of the article, when a user wants to make a modification on one generated at another time.
Module finder
This module allows us to visualize the existing pages of our blog, with the possibility of modifying them, eliminating them or establishing if in the next synchronization they have to be online in the web server, or in the opposite case we establish that they are not synchronized and exist only locally in our computer.
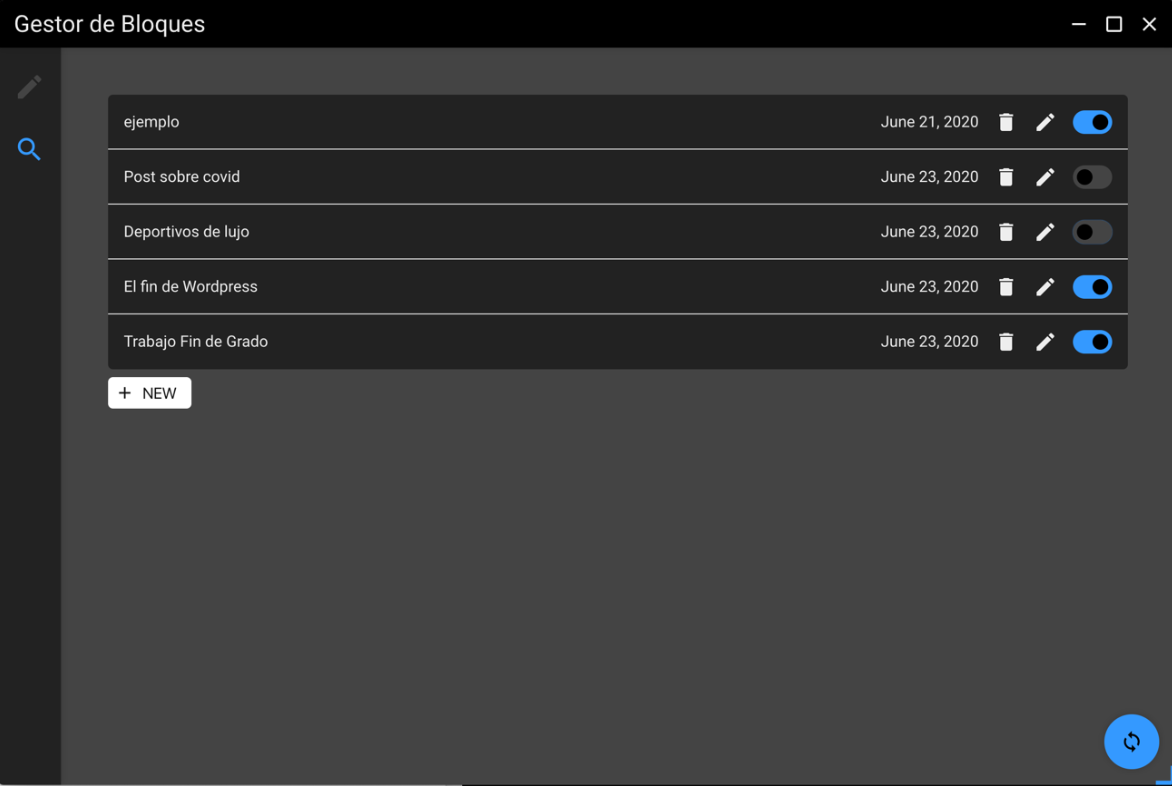
When we enter this module, the code makes a scan of the directory where the JSON files that are generated each time we create a new page are located, for each of these files, it adds a new entry in the interface with the data of the page in question that are obtained from this same JSON file, specifically the name of the URL and the date on which the page has been created.
Events on pages
On each of these entries, that is, for each of these pages that have been previously created from the editor, we have three possible options.
If the user wants to delete a page that is no longer needed, there is a trash can button. When clicked, the application looks for the JSON and HTML file corresponding to this entry and deletes them, and in turn removes the entry from the DOM in the interface.
If we want to add new content or simply edit existing content on a page that has already been created, we have the edit button. To edit a page consists of sending the user to the edit module, but previously establishing in a cookie determined for this purpose, the identifier of the page to be edited. When the editor module loads, it checks if this cookie has something, if so, instead of loading from scratch, it uses the JSON file of the page to edit and the existing blocks in this article are rebuilt on the interface.
The blue and black switch shown in Figure 16, is used to mark if we want a page to be synchronized with the server in the next synchronization, if it is deactivated it will not be uploaded and if it was already uploaded, it will be deleted from the server. In order to store the information of which page is to be uploaded and which is not, we also use its JSON file in which a boolean property is modified between true and false, each time we press the switch.
Finally, we find the "new" button, this will allow us to create new pages from scratch. If we edit a page in the editor, no matter how much we move to another module and come back, the editor will still have the content you were writing, to reset the editor and start a new page it is necessary to access from this button inside the finder module.
Synchronization
The most important part of the application is the synchronization between the files created by the content manager on the user's personal computer and the web server. Like the rest of the communications with the application server, the synchronization is carried out by SHH instructions.
To start the synchronization, click on the synchronize button located at the bottom right of Figure 16. Each of the existing pages in the manager is scrolled, if they have the property "online" with the value true, the corresponding HTML file is uploaded to the server. This upload only occurs after verifying that the file is not already on the server, we know this by another property other than the JSON that indicates whether it has been uploaded to the server at some point, or if it is on the server and comparing the date on which it was uploaded with the date of the last modification of the article, this last one is more recent than the previous one. All items that are as online we store them in an array for the construction of the main page of the blog.
When an article is marked as not synchronized, it is not enough to do nothing because it may have already been synchronized and is online, therefore, if the JSON indicates that the article is on the server, by SSH we will delete the file on the server.
When synchronizing it is not enough just to upload the files of each of the articles, but it is necessary to generate an index page that shows the blog entries and can access each of the articles. Every time we synchronize, the main page of the blog that exists at that moment is eliminated and a new one is generated from scratch. For each of the existing articles the "entry.shtml" template is used as explained in section 7.9.3, and above and below the rest of the web template. Once this HTML file is created, like the others, it is uploaded to the server, leaving the blog completely updated.
Future enhancements to the application
Block manager is a small functional demo of a more powerful content manager that will be developed later in this dissertation. As any demo and due to time constraints for a dissertation there are a number of features not implemented in this demo but worth mentioning.
More types of blocks
As mentioned above, this demo only contains four different types of blocks: title, subtitle, header and text. However, in order for users to be able to write an article, you need to provide them with some more tools, such as image blocks or source code blocks, if the blog belongs to a developer.
An image block is a bit more complex than any text type block for two reasons, the preview of the image in the block once inserted by the user and the functionality of how to insert the image. To solve this second one as professionally as possible, it would be necessary to layout an input of type "file" with a large section that also supports dragging a file inside (drag and drop), Electron incorporates in its API a specific functionality for this.
Module products
A large percentage of websites today are e-commerce, small businesses that sell their products through a web page. One of the objectives with this manager in the future will be the incorporation of a new module that allows you to create a product catalog, this would be the way to monetize the application, provide users with a payment gateway from the manager that is own and charge a commission for each sale made on web pages created with my application.
Offline mode and asynchronous synchronization
One of the advantages of being a desktop application is that it could be implemented in a way to make use of it without the need of having an internet connection. This could be implemented using the last "users.json" file downloaded from the server for the login, all the changes on the pages would be registered on a JSON with the history of changes that later could be contrasted with the server and possible modifications made by other users to solve possible conflicts. When the user comes back online, all the changes made during the offline use would be automatically synchronized with the server.
Currently during the synchronization process the application is frozen while this process is being performed, if the volume of items is very large, this process can take several minutes. It is interesting that the execution of this process is done asynchronously with respect to the rest of the application, this way we could continue using it while synchronizing.
Testing performance
Once the application was fully functional, I thought it would be interesting to make a comparison between a page of my blog generated with my content manager and the same article made in a newly installed WordPress, to obtain the processing times at the server level, loading and running the page. This allows me to draw conclusions about which of the two managers gets better performance.
In the comparison it must be taken into account that I am "giving an advantage" to WordPrees, since it is without any plugin installed. To be able to make the comparison on equal terms, in terms of SEO, it would be necessary to install at least the "Yoast" plugin. To replicate my website's interface exactly in WordPress I would need to load additional plugins and customizations that would add even more time to this loading process.
To perform the tests I have used two identical servers with the Arsys provider, specifically two virtual CentOS 8 servers with Plesk installed, which is nothing more than a friendly panel to manage Apache underneath. As far as DNS resolution is concerned, I have forced the computer to use a DNS resolution service 8.8.8.8.8 and 8.4.4.8, i.e. Google DNS, which cache the DNS lookup resolution, making these times null (0 ms) and therefore discarding this variable from the results obtained.
In order to record the time taken to process each resource loaded on the web page, I used Chrome DevTools in an incognito tab, so I make sure that in my browser cache there are no resources from the websites and a request is made from scratch [23].
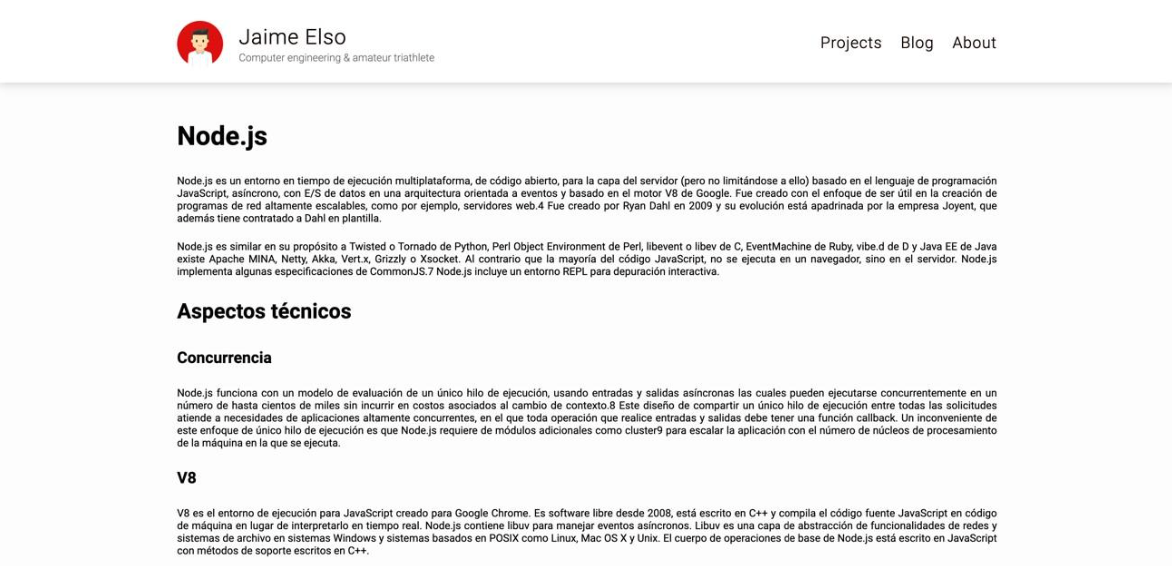
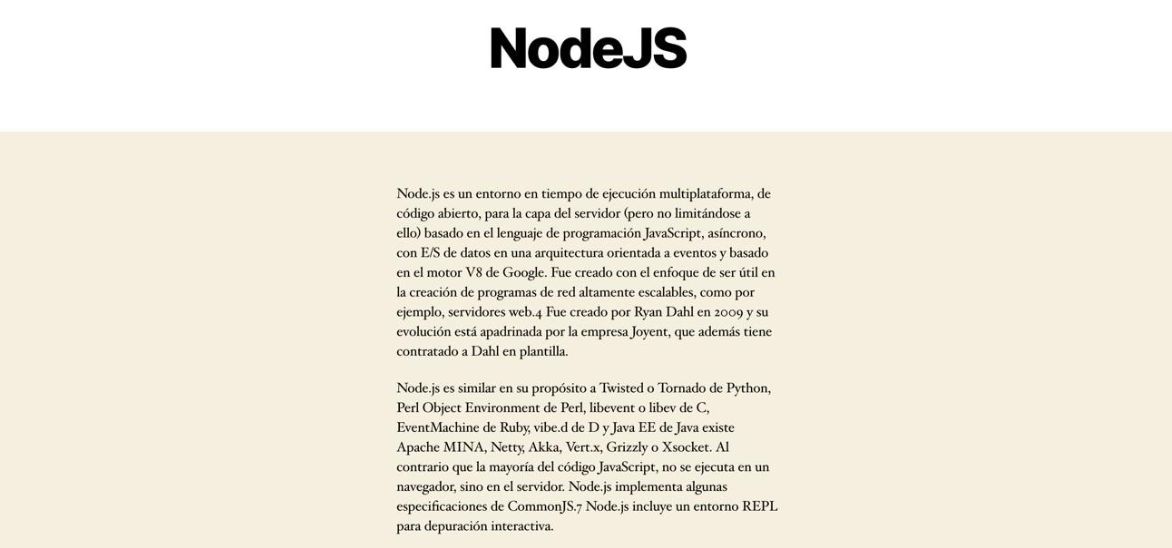
In illustrations 17 and 18 we can see the same post with the same text. Illustration 17 is my web page generated with the CMS developed in this TFG. Illustration 18 is a page generated by WordPress with the same content as the article on my website.
When using the Network tab of the Chrome DevTools there are three different time measurements we can take that are important to differentiate:
- DOM Content Loaded represents the time the web page takes from the time the browser makes the URL request until the HTML document is fully loaded in the browser and interpreted, this time is taken before requesting extra resources it needs such as images or style sheets [24].
- Load is the DOM Content Loaded time adding also the time spent in requesting and downloading the additional resources that are requested in the HTML.
- Finish marks the time at which the page has finished being graphically represented in the browser.
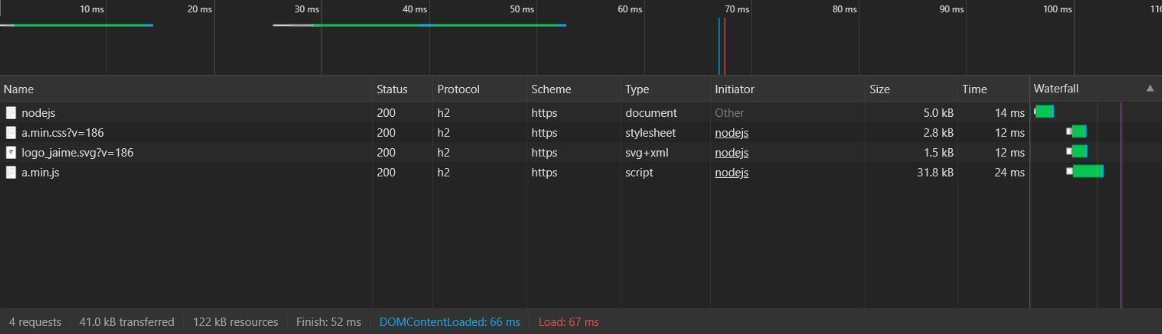

Illustration 19 corresponds to the results obtained from the web page generated with my manager, while illustration 20 shows the results of the page generated with WordPress. The samples taken correspond to a measurement taken at a specific time, every time you make a request these times fluctuate, but the same trend is maintained so it is sufficiently relevant to comment on the results. The difference is appreciable, in terms of time, disk space occupied by the resources that make up the page and number of requests, being that the page generated with my manager has loaded in about one sixth of the time and transferring less than 10% of the data than the page generated by WordPress.
As far as the number of requests is concerned, by using code made by and for this page I can reduce the number of files needed and optimize its compression which means fewer requests to the server and smaller size. WordPress, on the other hand, loads a number of resources defined by the manager itself and the template used, this being one of the "lighter templates". The difference is appreciable, going from ten requests to four. With this optimization, the data transferred is reduced by 80%, 122 kB of resources on my web page while WordPress is transferring 582 kB since, in addition, it is transferring more code than necessary to display this specific page. This difference in transferred resources, as the website becomes more complex, will become more relevant, thus obtaining better response times than a conventional WordPress site.
Getting the DOM Content Loaded, Load and Finish as low as possible, allows the page elements to be available to the browser sooner. From the point of view of a human user's interaction with the web page, this is important because, as discussed below, the user experience is practically immediate (events controlled by JavaScript...). On the other hand, from the point of view of search engines, it is a competitive advantage because they have to spend less time analyzing the page and the score obtained is better.
In order to put into context the times obtained with respect to the reaction of a human being to an event that requires an interaction, it is necessary to have data on the average response time of humans.
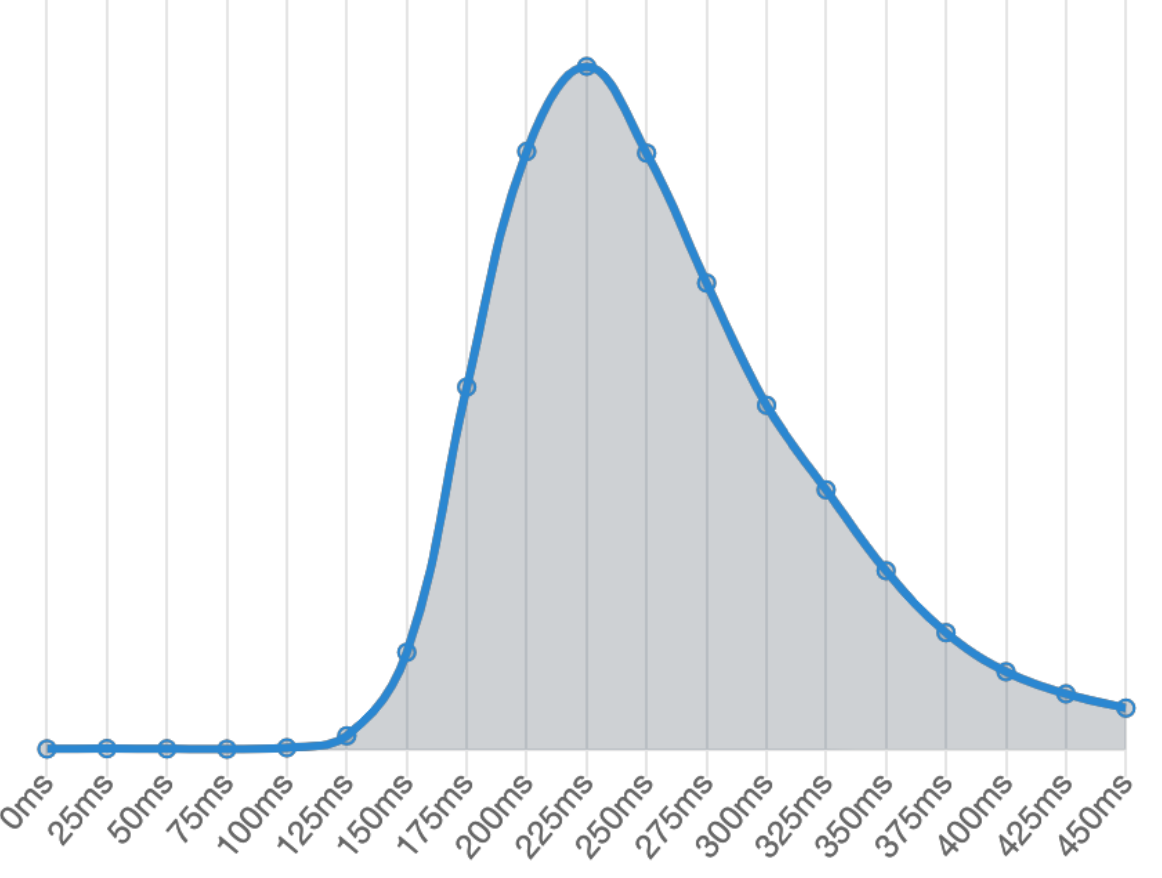
The graph shown in Illustration 21, shows the response time of a human being to an element that requires interaction, it has been obtained by taking 81 million samples and the average is 284 ms. This implies that interactions with my web page do not require waiting on the part of the user, having obtained a time of 52 ms of graphic representation (Finish), the user will not have to wait for a content to load before interacting with it. The video standard, 24 frames per second, shows us that the human eye can not appreciate jumps below 42 ms, so the loading time between the end of downloading the HTML (14 ms) and the time it takes to display the entire page (52 ms) gives a difference of 38 ms, which would be approximately 0.9 frames, is not noticeable, giving the feeling of an "instant" load. This same in the loading of WordPress if it is appreciable, since the time between downloading the HTML (76 ms) and the Finish (369 ms) gives a difference of 293 ms that would be approximately seven frames, so the human eye would notice the difference. In a simple page these data in both cases are low, but, as the complexity increases, the difference in time is much more relevant.


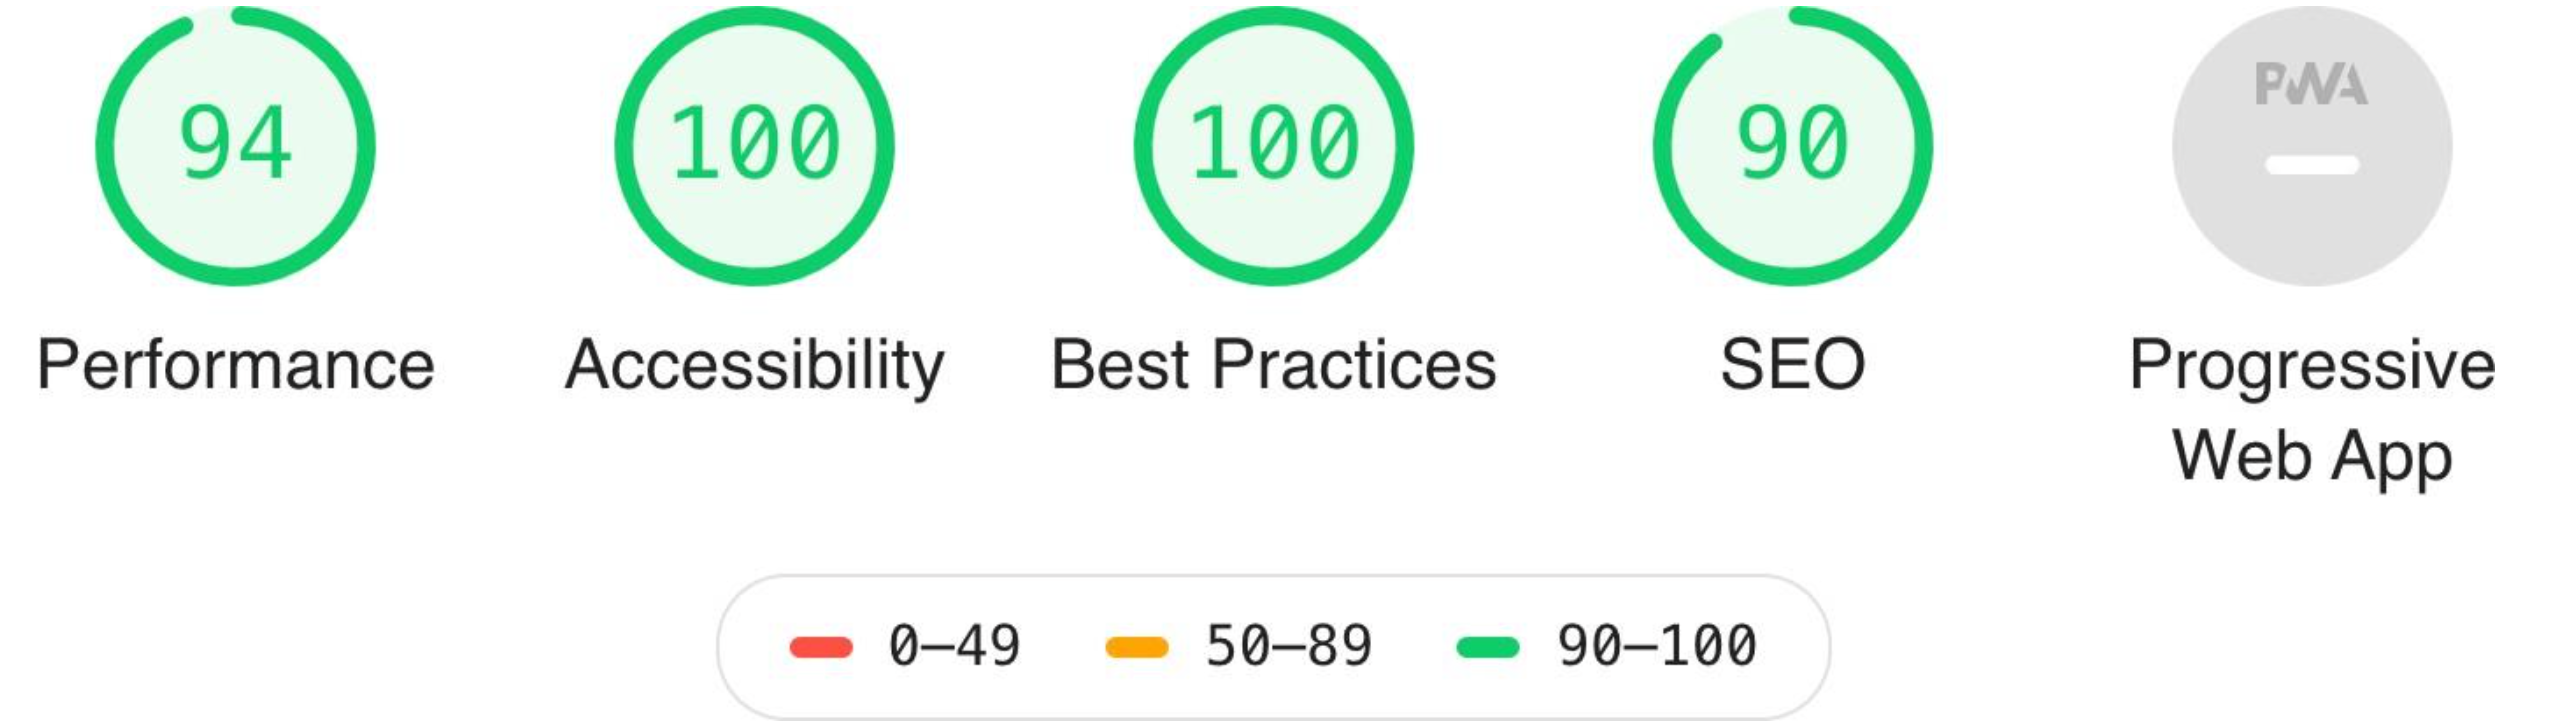
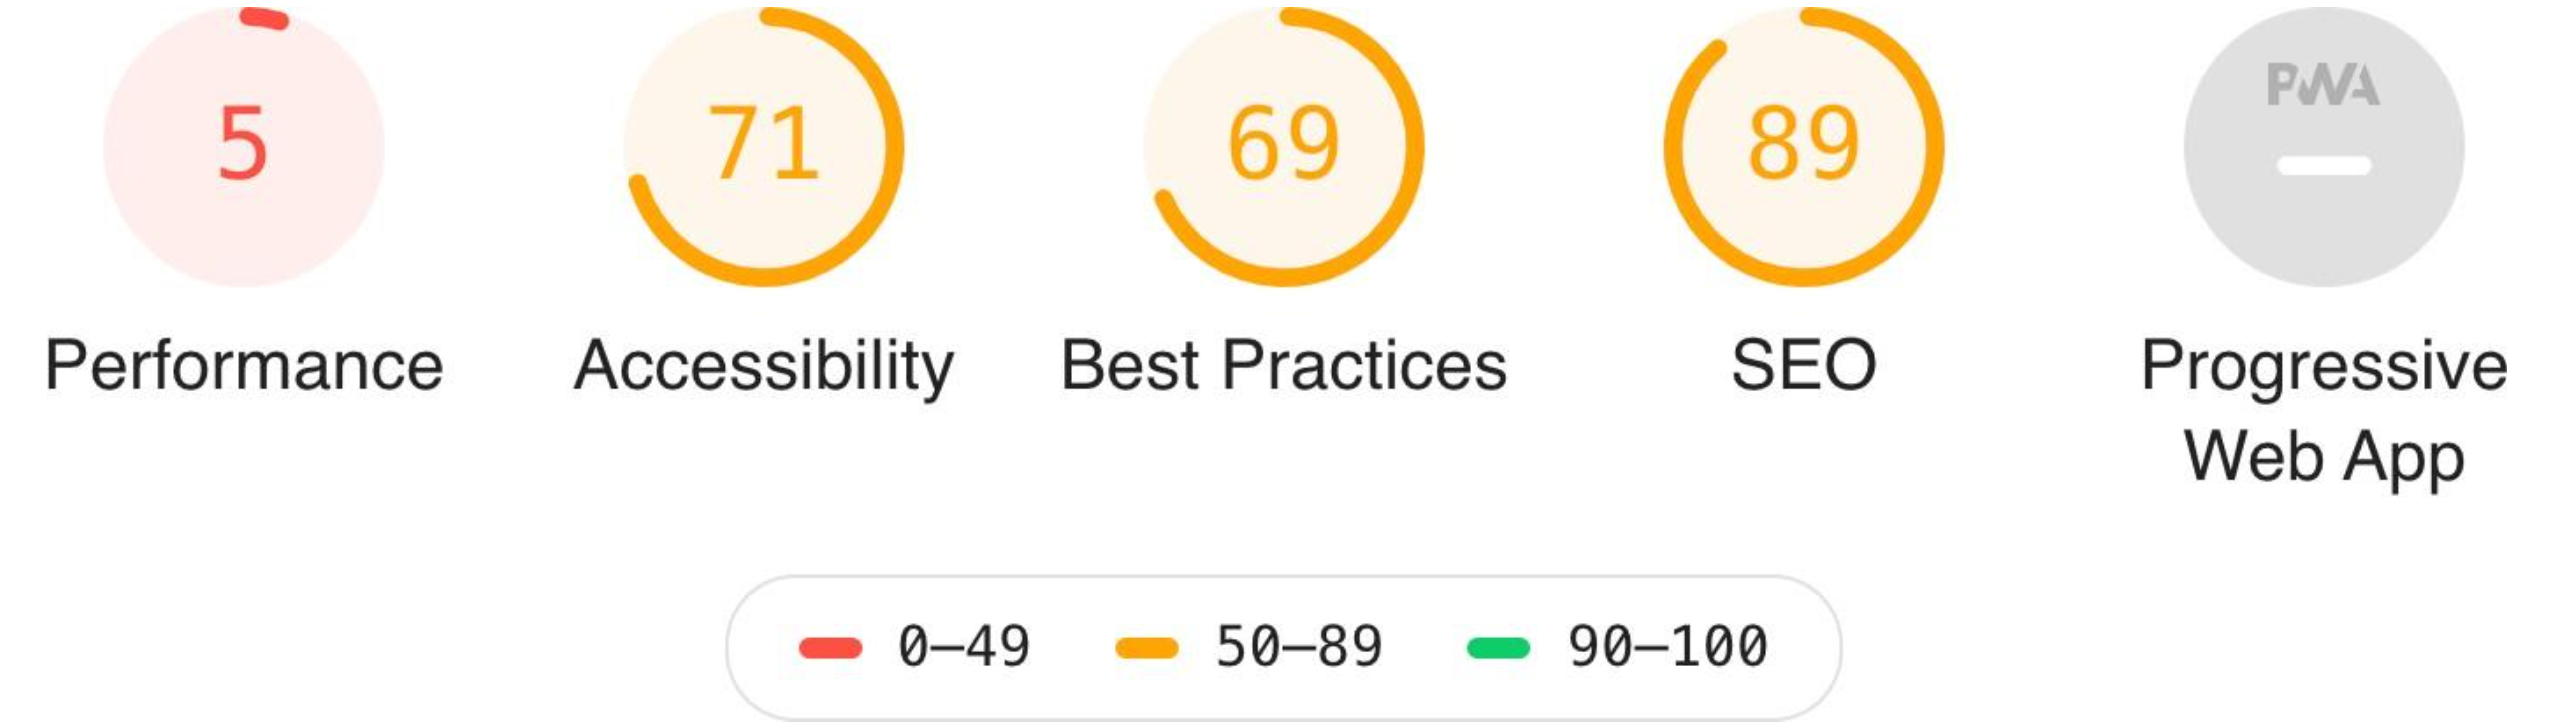
These improvements in time and resource optimization that we have discussed are reflected in the reports generated by the Lighthouse tool in Illustrations 22 and 23, their complete reports are in Annex C and Annex D of the report. We can see how the page generated by my content manager has obtained a hundred of valuation, while the page generated by WordPress has only obtained an eighty-five.
If we look at the full report, we see how Lighthouse is positively valuing my web page having loaded only the CSS style rules that are completely necessary for the document, as well as loading them in an orderly fashion. The same applies to JavaScript, being only the functions used and not forcing the page to have to be re-rendered again during execution.
The result obtained in SEO is due to the fact that my page has been generated with all the necessary content at the search engine optimization level. The metadata necessary for the correct identification of the page has been loaded, while the WordPress not having been configured with additional plugins (not to further worsen the result of WordPress in performance) does not have these elements.
Conclusion
This project arose to solve a problem that I found developing my website and that none of the applications or technologies that I evaluated gave me a solution that seemed to me indicated for the use that I was going to give it. Taking advantage of the need and motivation to deepen in this area, the idea of creating this desktop application compatible with all operating systems and all types of web hosting was born.
Throughout the TFG process I have delved into current technologies such as NodeJS and Electron, following the market trend, porting web technology to desktop applications. I have been able to better understand the behavior of browsers, especially Chrome, the browser used by Electron to display the interface and JavaScript engine used by NodeJS as an interpreter. Also elements that influence the evaluation of a web page, especially through the Lighthouse and Chrome Dev Tools, which I have taken full advantage of to analyze the results obtained and discovering in many cases elements that are valued and are not initially taken into account.
At first, thinking about developing a tool that allows you to create and manage static content seems like a simple idea. The reality is quite different when you get down to it. The elements that make up the DOM [26], as well as the resources that modify it, generate a web page with a complex structure and must be taken into account when it is generated, making development more complicated. To all this, we must add the components of connection with the server, editing module, user management and graphical interface that have turned out to be more complex than I initially imagined.
With my dissertation I have confirmed my initial hypothesis, although the tests carried out in this project are not enough to be able to say categorically, WordPress with the default configuration and without using additional plugins, when creating a simple web page, has not been the most efficient application, generating a slower page and with less SEO rating.
The application I have developed, instead, has turned out to be a very good generator of web pages, achieving an excellent performance and a good SEO positioning in each publication. The loading of these pages is visually instantaneous, 56 milliseconds, the data transfer is reduced to the just and necessary for each page and the number of requests to the server is reduced to the maximum (as can be seen in section 8).
Download PDF of my Bachelor's Thesis.
Thanks for reading! Catch you in the next one.